Landscape Timelapse

Sometimes it can be fun and go out and experiment with a camera. Especially if it’s something you do not usually need to do or know a great deal about in everyday life being a Corporate Photographer in London. I have never actually been asked to capture time laps professionally but wanted to have a play at it just in case someone does!

The old and correct way was using cinematic film and shooting over a period of time and then speeding the whole process up in edit to the desired effect. With digital cameras it’s pretty much the same procedure by taking a sequence of frames and joining them up into a cinematic view in post edit on computer.

I think some of the best ones done are where a camera is positioned and the operator does sequences of perhaps a structure being built or building project that can take a good deal of time but weeks worth of events are crammed into a few minutes of time. Also the ones where there are high skyscraper views over a city and the day turns to night and all the lights come to life on all the buildings. Next time I’m in a hotel on the 25th floor I promise I will do one and share with you.

The process is pretty simple once you have understood how many frames you need for the period of time you want the ‘video’ to run for. One second of time equals 25 frames in video in the UK. So two hundred images will give you an eight seconds clip. Most modern cameras give you a nine hundred and ninety nine frame count in one shoot but this can be overridden and reset. The only problem I have with this method is that you need to stay with the camera as its shooting its sequence on a tripod that is a necessity, because you cannot leave you valuable camera unattended due to theft! The only way this can be done is if you have a safe box that the camera unit is actually locked away in and this in turn is fastened securely to a mounting on site.

Good Luck if you give it a go, this is one I did one breezy afternoon recently just for fun.

Please share:

UKHO Commercial Conference 2014, London

Alternative Images corporate photography was asked to cover the 2014 conference at the Millennium Gloucester Hotel, Kensington again this year for The United Kingdom Hydrographic Office. The conference was about the ever increasing database of digital information to be used alongside the traditional use of paper maps in navigating ships around the world and the many ports they have to visit.

The conference was attended by approximately ninety people who have a great interest in the information discussed by UKHO during the day. Alternative Images covered all the morning presenters’ shots and organised before the afternoon session a group photograph on stage of the attendees where they will each receive a print copy.

Together, the ADMIRALTY Vector Chart Service and ADMIRALTY Raster Chart Service give you easy access to the world’s widest suite of digital charts. Ideal for both planning and navigation, they can help simplify operational tasks and improve situational awareness.

AVCS provides the widest official digital chart coverage available, allowing ships to navigate to 4,000 of the busiest ports in the world. When this coverage is used alongside ARCS, bridge crews can quickly identify additional information – such as dredged depths and berth names – that can help to improve efficiency and safety on the bridge. This combination of wide coverage, familiarity and ease of use gives you the most trusted digital chart service for ships trading internationally.

Peter Austin of Alternative Images Photography has worked with this client over many years being an established business in conference photography and video production.

UKHO Commercial Conference 2014

UKHO Commercial Conference 2014 London

Please share:

Image Retouching Past to Present

Sometimes it is necessary to do retouching on an image to obtain the best result for where it will be used. In past days of the film world a photographer would have to take extra care in noticing what is in the shot being taken because with film once shot its shot and correction was virtually impossible. This actually made the older generation of photographers out there more precise on what they were trying to achieve.

With film the only way an image could be corrected after it has been taken would be to actually retouch a transparency. Yes, that right you younger generation digital users out there, retouch a piece of positive film. This was an extremely talented process where an artist who could look at the image and then paint over the emulsion of the film the correction. Then when scanned it would be correct for print. This was a consideration not taken lightly due to the costs involved. The only other way to correct the image was to do a complete reshoot and sometimes this was not possible.

With the introduction of the digital age an image now can be cleaned up at the post production stages and small imperfections can be removed and replaced to create the desired effect. Little issues that I would notice when taking a photograph in the first place would be objects or litter on a pavement with an external shot or an untidy desk with used plastic coffee cup while taking a portrait.

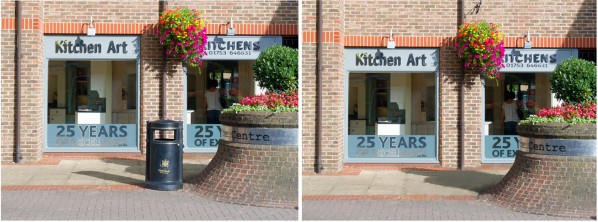
As a corporate photographer in London I recently photographed a series of kitchen installations and my client wanted to use an image of the external view of the high street outlet in the advertising campaign. The only angle available to me that made the correct shot also had an obstruction of the council street bin. With film you would have had to live with it but as you can see from the two images here after a little work the bin has been removed and the wall and pipe work replaced as it was never there. This makes the image overall more attractive because before my eye would home in on the unsightly refuse container that could not be moved out of the way.

So the retouching process in modern life can be a great advantage with weddings, replacing skies on dull days and removing unwanted areas of imperfections. This has also opened up a world of services to the creative person but it is a shame that it has actually taken away the personal skill and eye of a particular photographer that would separate him or her from the rest of a crowd.

Retoching Images

Bin Removal on Image

Please share:

Insect Photography Tutorial (Part Two)

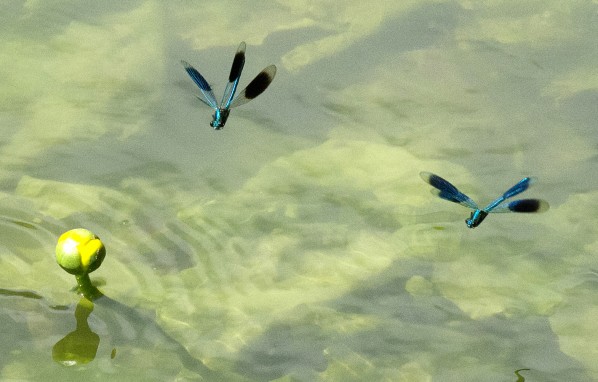
It is best to do this on a sunny day to have plenty of light and to give good contrast to the shot. This subject does not lend well to dull light conditions and needs the intensity of sunlight to display colours. It is impossible to follow one around as it is flying; the creature is way to fast to focus on or follow in a view finder so it is best to pick a spot where it is landing or taking off from and focus on that point.

Firstly you need to have some depth of field to your focus so as the dragon fly moves in flight wherever the position is there is enough depth to keep the focus. This was shot about f11. Then you need to consider shutter speeds to keep the image sharp. The wings move very quickly so to freeze them I used a shutter of 3200 sec.

To match the depth of field and shutter speed you then set a desired ISO to match them, possible around the 1000 area depending now on the light conditions. If you are able to achieve a lower ISO rating with the shutter and f: settings even the better for quality to the shot. This is where the Nikon D4 is one of the best cameras to use due to the high ISO settings you can use with virtually no noise visible in the image.

The last thing is to have the shutter set to continuous so it releases about 11 frames per second in bursts. You cannot wait for the insect to fly and then press the shutter, you will miss it. This critter moves fast and your eye awareness to brain reaction is way to slow. So here you need to predict its movement. Yes it may not move as you shoot and you will need to try again but the wonder of digital is that you do not waste film, there is a delete button so edit the card as you shoot.

Dragon Fly, Tutoial


Please share: